YomiToku Installation Guide
This guide explains the installation steps for YomiToku according to license types (Subscription, Perpetual Online Authentication, Perpetual Offline Authentication). If you have any questions, please contact support@mlism.com.
🚩 Prerequisites
Prepare the following beforehand:
- Python 3.10 or higher
- PyTorch (Install according to your GPU environment. GPU environments with VRAM of 8GB or higher recommended)
GITHUB_PERSONAL_TOKEN(Refer to your license document)YOMITOKU_LICENSE_KEY(Refer to your license document)YOMITOKU_SECRET_KEY(Refer to your license document; supported from v1.2.5 onwards after 2025/6/2)
📌 Installing YomiToku-Pro via GitHub
- Version specification is optional.
When cloning the repository
You can also clone the repository to review the source code contents.
📌 Authentication Methods
| License Type | Authentication Method | Device Changes |
|---|---|---|
| Subscription | Online authentication via HTTPS communication with license server | Freely changeable |
| Perpetual (Online) | Device registration followed by online authentication via HTTPS | Freely changeable |
| Perpetual (Offline) | Device registration followed by local authentication via issued server token | Requires contacting MLism |
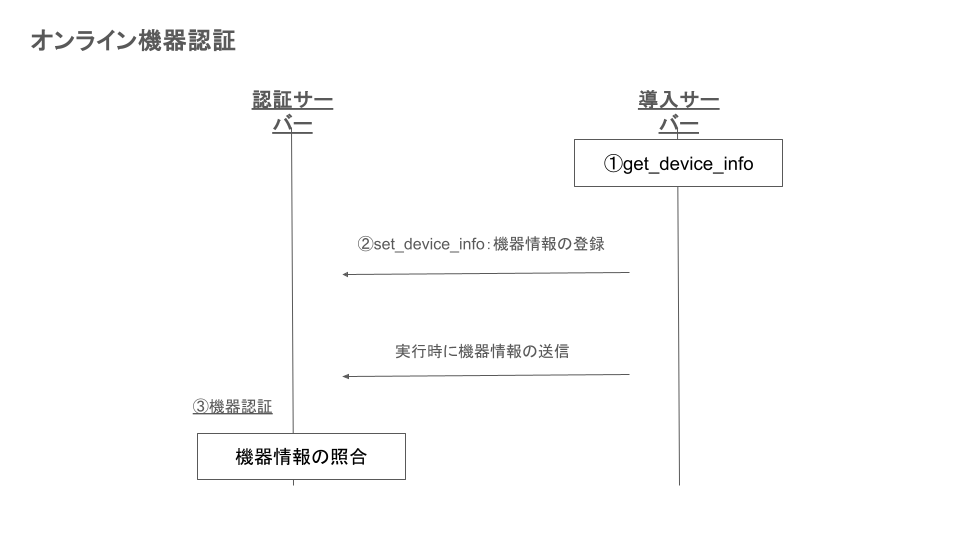
Online Device Authentication (Perpetual Online)
Used when the deployment server can communicate with the license server via HTTPS.
- Obtain device info: Run
get_device_infoto collect hardware information from the deployment server, encrypt it, and save it. - Register device info: Run
set_device_infoto register the machine fingerprint with the license server. - Device authentication: At runtime, YomiToku automatically sends device information to the license server and verifies it against the registered fingerprint.
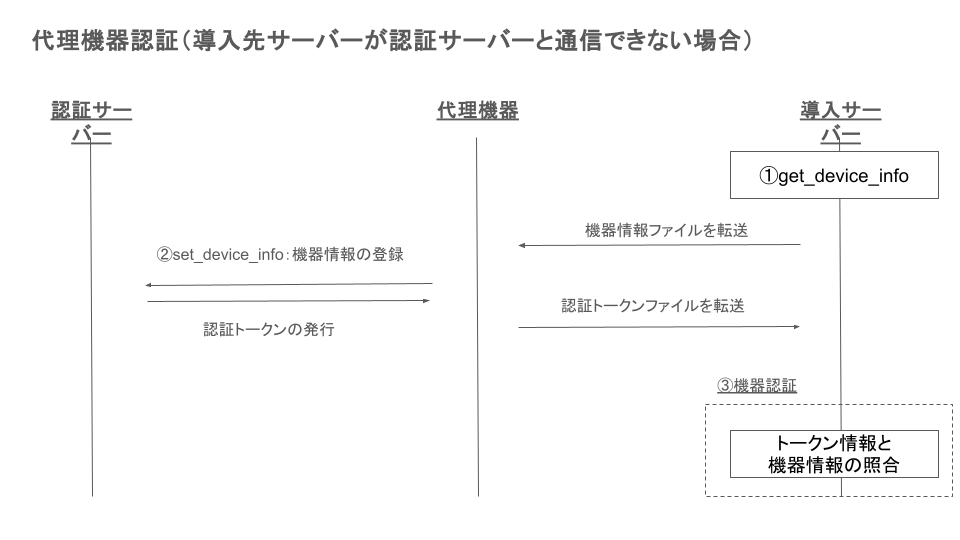
Proxy Device Authentication / Offline Device Authentication (Perpetual Offline)
Used when the deployment server cannot communicate directly with the license server. A token is obtained via an internet-connected proxy machine and authentication is performed locally.
- Obtain device info: Run
get_device_infoon the deployment server and retrieve the device info file. - Register device info and obtain token: Transfer the device info file to an internet-connected proxy machine, run
set_device_info --get_tokento register with the license server, and receive an authentication token. - Device authentication: Transfer the authentication token file to the deployment server and set the
YOMITOKU_DEVICE_TOKENenvironment variable. At runtime, YomiToku verifies the token against the local machine fingerprint (no connection to the license server is required).
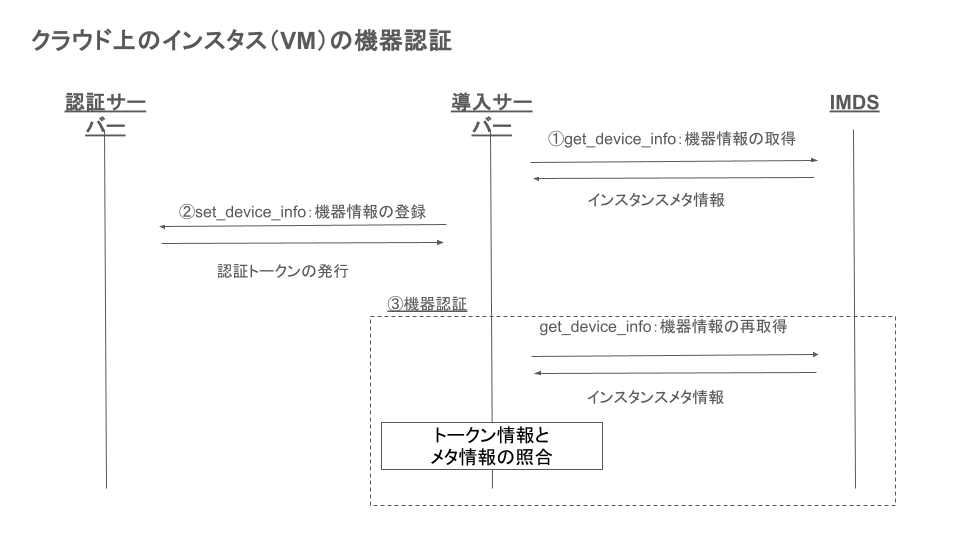
Cloud Instance (VM) Device Authentication
When using a perpetual license on cloud instances such as AWS EC2, device fingerprints are generated from instance metadata retrieved via IMDS (Instance Metadata Service).
- Obtain device info: The
get_device_infocommand queries IMDS (IMDSv2) and retrieves metadata such as instance ID, AMI ID, and instance type. - Register device info: Run
set_device_infoto register with the license server and receive an authentication token. - Device authentication: At runtime, YomiToku retrieves metadata from IMDS again and verifies it against the token information.
About Machine Fingerprints
The machine fingerprint is a SHA-256 hash generated from hardware information collected according to the YOMITOKU_ENV environment variable. Authentication is performed by confirming that the same information is generated at registration time and at runtime.
YOMITOKU_ENV |
Collected Device Information |
|---|---|
on-premise |
Hostname, OS information, CPU model/architecture/core count (GPU UUID when CUDA is available) |
aws / aws-ec2 |
EC2 instance ID, AMI ID, instance type, private IP address (via IMDSv2) |
aws-ecs |
ECS task ARN, container ARN (via ECS Task Metadata Endpoint v4; requires ECS_CONTAINER_METADATA_URI_V4 environment variable) |
🔧 Example of Environment Variable Settings
Linux / macOS
export YOMITOKU_LICENSE_KEY="your_license_key"
export YOMITOKU_SECRET_KEY="your_secret_key"
export YOMITOKU_ENV="aws"  # Only for perpetual licenses (choose one: on-premise, aws, aws-ec2, aws-ecs, azure)
Windows (PowerShell)
$env:YOMITOKU_LICENSE_KEY = "your_license_key"
$env:YOMITOKU_SECRET_KEY = "your_secret_key"
$env:YOMITOKU_ENV = "aws"  # Only for perpetual licenses (choose one: on-premise, aws, aws-ec2, aws-ecs, azure)
📥 Installation Steps by License Type
🟢 Subscription License
No additional configuration is required for subscription licenses. Set environment variables and proceed with the installation steps below.
🔵 Perpetual License (Online Authentication)
① Obtaining Device Information
| Option | Required | Description |
|---|---|---|
-o |
✔ | Directory to store device information |
② Registering Device Information
set_device_info -k ${YOMITOKU_LICENSE_KEY} -s ${YOMITOKU_SECRET_KEY} -f ./device_info/device_info_*.txt
| Option | Required | Description |
|---|---|---|
-k |
✔ | License key |
-s |
Secret key | |
-f |
✔ | Path to obtained device information file |
🔴 Perpetual License (Offline Authentication)
① Obtaining Device Information (Run on the PC where YomiToku is executed)
| Option | Required | Description |
|---|---|---|
-o |
✔ | Directory to store device information |
② Registering Device Information and Token Retrieval (Run on Internet-connected PC)
set_device_info -k ${YOMITOKU_LICENSE_KEY} -s ${YOMITOKU_SECRET_KEY} -f ./device_info/device_info_*.txt -o ./token_dir --get_token
| Option | Required | Description |
|---|---|---|
-k |
✔ | License key |
-s |
Secret key | |
-f |
✔ | Path to obtained device information file |
-o |
✔ | Directory to store authentication token |
--get_token |
✔ | Retrieve authentication token |
③ Place the token on the target server and set the environment variable
④ Checking Token Expiration and Refreshing
Warning
The update_token command is only applicable to device-authenticated licenses that use an expiring device token (such as the perpetual offline authentication license). It is not needed for subscription licenses or for licenses that use non-expiring tokens.
Device tokens embed an expiration date and must be refreshed before they expire. The update_token command checks the expiration of an existing token and only retrieves a new one from the license server when the remaining days fall at or below the threshold.
| Option | Required | Description |
|---|---|---|
--license_key |
License key (falls back to the YOMITOKU_LICENSE_KEY environment variable) |
|
--secret_key |
Secret key (falls back to the YOMITOKU_SECRET_KEY environment variable) |
|
--token_path |
Path to the existing token file whose expiration is checked (falls back to the YOMITOKU_DEVICE_TOKEN environment variable) |
|
--out |
Directory to store the new token (defaults to the parent directory of YOMITOKU_DEVICE_TOKEN, or the current directory if neither set) |
|
--threshold_days |
Refresh the token when the remaining days are at or below this value (default: 7) |
|
--force |
Refresh the token regardless of the expiration | |
--check_only |
Only check the expiration without refreshing the token |
Note
With YOMITOKU_DEVICE_TOKEN set, running update_token with no arguments will overwrite the token in place.
Usage Examples
① Check the expiration only (no refresh)
Displays the current token's expiration date and remaining days in the log without refreshing. Useful for pre-deployment verification or monitoring.
② Refresh only when the remaining days fall below a threshold
With YOMITOKU_LICENSE_KEY / YOMITOKU_SECRET_KEY / YOMITOKU_DEVICE_TOKEN set as environment variables, this checks the token's remaining validity and refreshes it from the license server only when 7 or fewer days remain. The new token is saved in the same directory as the existing one.
③ Force refresh regardless of expiration
Use this when you need to re-issue the token immediately, such as after a hardware configuration change.
④ Specify the output directory explicitly
By default the new token is saved to the parent directory of YOMITOKU_DEVICE_TOKEN. Use --out to override with any directory.
⑤ Specify all parameters via command-line arguments
If you prefer not to use environment variables, you can pass the license key, secret key, and existing token path as arguments.
update_token \
    --license_key "your_license_key" \
    --secret_key "your_secret_key" \
    --token_path /path/to/device_token.txt \
    --out /path/to/token_dir \
    --threshold_days 7
Specifying a Single GPU for Device Authentication on Multi-GPU Machines
On machines with multiple GPUs, all GPU information is used for device authentication by default. If you want to use only a specific single GPU's information as the authentication key, set the YOMITOKU_GPU_UUID environment variable before performing steps ① through ③ above.
Note
Setting YOMITOKU_GPU_UUID only specifies which GPU is used as the authentication key. It does not restrict other GPUs from being used for inference. All GPUs remain available for inference.
1. Retrieve the GPU List
Run the get_device_list command to check the information of installed GPUs.
The index, UUID, and device name of each GPU will be displayed as follows:
[{'index': 0, 'name': 'NVIDIA A100-SXM4-40GB', 'uuid': 'GPU-xxxxxxxx-xxxx-xxxx-xxxx-xxxxxxxxxxxx'},
 {'index': 1, 'name': 'NVIDIA A100-SXM4-40GB', 'uuid': 'GPU-yyyyyyyy-yyyy-yyyy-yyyy-yyyyyyyyyyyy'}]
2. Set the UUID as an Environment Variable
Set the UUID of the GPU to use for authentication in the YOMITOKU_GPU_UUID environment variable.
Linux / macOS:
Windows (PowerShell):
3. Obtain and Register Device Information
With the environment variable set, proceed with steps ① through ③ above. Only the specified GPU's information will be used as the device information.
📦 Pre-downloading Models (for Offline Environments)
Pre-download models on an Internet-connected environment. The models will be downloaded to the MLism/ directory. Place the MLism/ directory in the root of your current directory at runtime.
Specifying Models You can download specific model files using the following option:
| Option | Required | Description |
|---|---|---|
--hf_hub_repo |
Model repository to download (All models if unspecified) |
(Refer to the original table for detailed model listings)
📌 Installation with uv
For GPU environments:
🐳 Running with Docker
Clone the repository and build locally.
Building the Docker Image
GPU Version (AMD64 + NVIDIA CUDA)
CPU Version
Starting the Container
GPU Version
docker run -it --gpus all \
    -e YOMITOKU_LICENSE_KEY=${YOMITOKU_LICENSE_KEY} \
    -e YOMITOKU_SECRET_KEY=${YOMITOKU_SECRET_KEY} \
    -v $(pwd):/workspace \
    yomitoku-pro:gpu /bin/bash
CPU Version
docker run -it \
    -e YOMITOKU_LICENSE_KEY=${YOMITOKU_LICENSE_KEY} \
    -e YOMITOKU_SECRET_KEY=${YOMITOKU_SECRET_KEY} \
    -v $(pwd):/workspace \
    yomitoku-pro:cpu /bin/bash
Device Token Setup (Offline Authentication)
To use a device token for offline authentication, you need to edit the Dockerfile directly.
- Place your device token file (
device_token.txt) in the repository root - Open the Dockerfile you are using (
dockerfile.gpuordockerfile.cpu) and uncomment the following lines
# Before (commented out)
#COPY device_token.txt ${server_dir}/device_token.txt
#ENV YOMITOKU_DEVICE_TOKEN=${server_dir}/device_token.txt
#ENV YOMITOKU_ENV=${ENVIRONMENT}

# After (uncommented)
COPY device_token.txt ${server_dir}/device_token.txt
ENV YOMITOKU_DEVICE_TOKEN=${server_dir}/device_token.txt
ENV YOMITOKU_ENV=production
Set YOMITOKU_ENV to the appropriate environment name for your deployment.
Note
To use YomiToku-Pro as an API server, see the Server page. Dedicated server Dockerfiles are available in the docker/ directory.